

How To: SharePoint Migration With TreeSize
A complete step-by-step guide
Joey
More and more companies are migrating their data to SharePoint, whether to the Microsoft 365 Cloud or to a local SharePoint on site.
Careful preparation of your SharePoint migration is particularly important: Which data should you transfer and which not? How do you need to prepare the directory paths? And how do you avoid wasting space in the expensive cloud?
In this guide, we will show you how to make TreeSize your SharePoint migration tool. How to prepare the migration efficiently and carry it out successfully!
Download our free trial version of TreeSize now and follow our step-by-step guide.
Table of contents
- Data owners decide which data is important and which is not
- Find and remove duplicate files
- Identify forbidden characters and file names
- Correct forbidden characters and file names
- Avoid migration of very large files
- Correct directory paths that are too Long
- Perform SharePoint migration with TreeSize
- Migrate very large amounts of data to SharePoint
- We advise you individually
Data owners decide which data is important and which is not
Let's start at the beginning: The aim of your migration should be to migrate only the data to SharePoint that is still needed.
No one can assess the relevance of individual files and documents better than their data owners - i.e. people or departments in your company who are technically responsible for the content.
With TreeSize, you provide the data owners in your company with a powerful tool for independently analyzing their data and clearing out obsolete or superfluous data before migration.
TreeSize reliably filters which files and documents, for example, exceed a certain age limit or have not been edited for a very long time.

You can break down and sort your server data using a variety of available metadata.
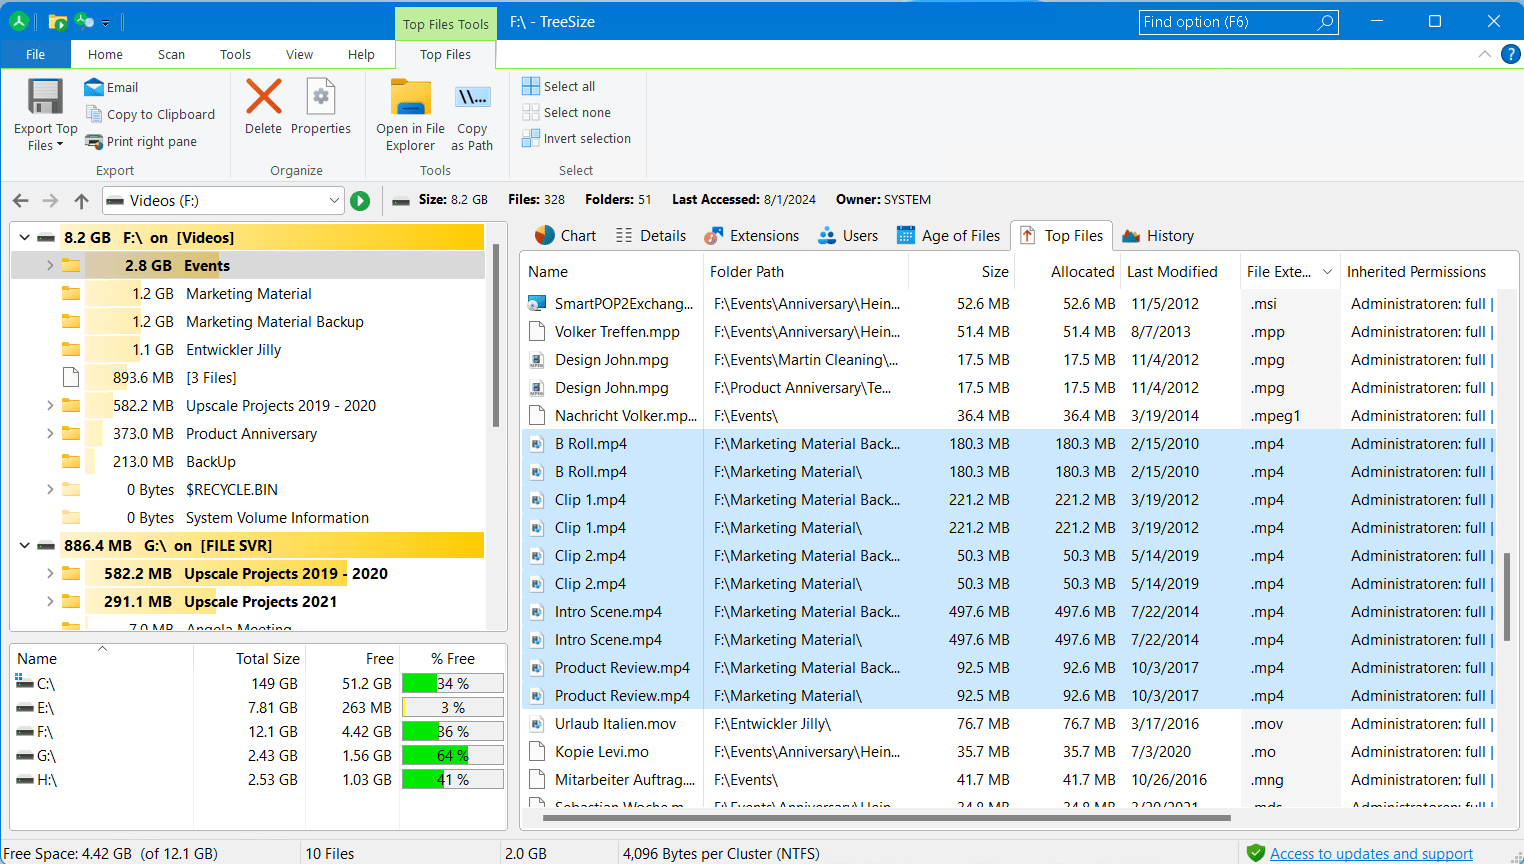
TreeSize allows old data to be archived quickly in the form of an end-of-life backup as a ZIP archive or on a USB data carrier. If the existing backup is sufficient for your organization, the data can also be deleted directly with TreeSize.
To do this, mark all the files you want to process with a checkbox. Or select all files directly using the master checkbox in the top left-hand corner of the results list header.
Then click on "Move / Copy" or "Delete" on the "Operations" ribbon bar.
Find and remove duplicate files
A SharePoint migration is also always a good time to clean up duplicate files so that they are not transferred to the new platform in the first place.
To do this, open the TreeSize file search and select "Duplicate search" from the selection on the left.
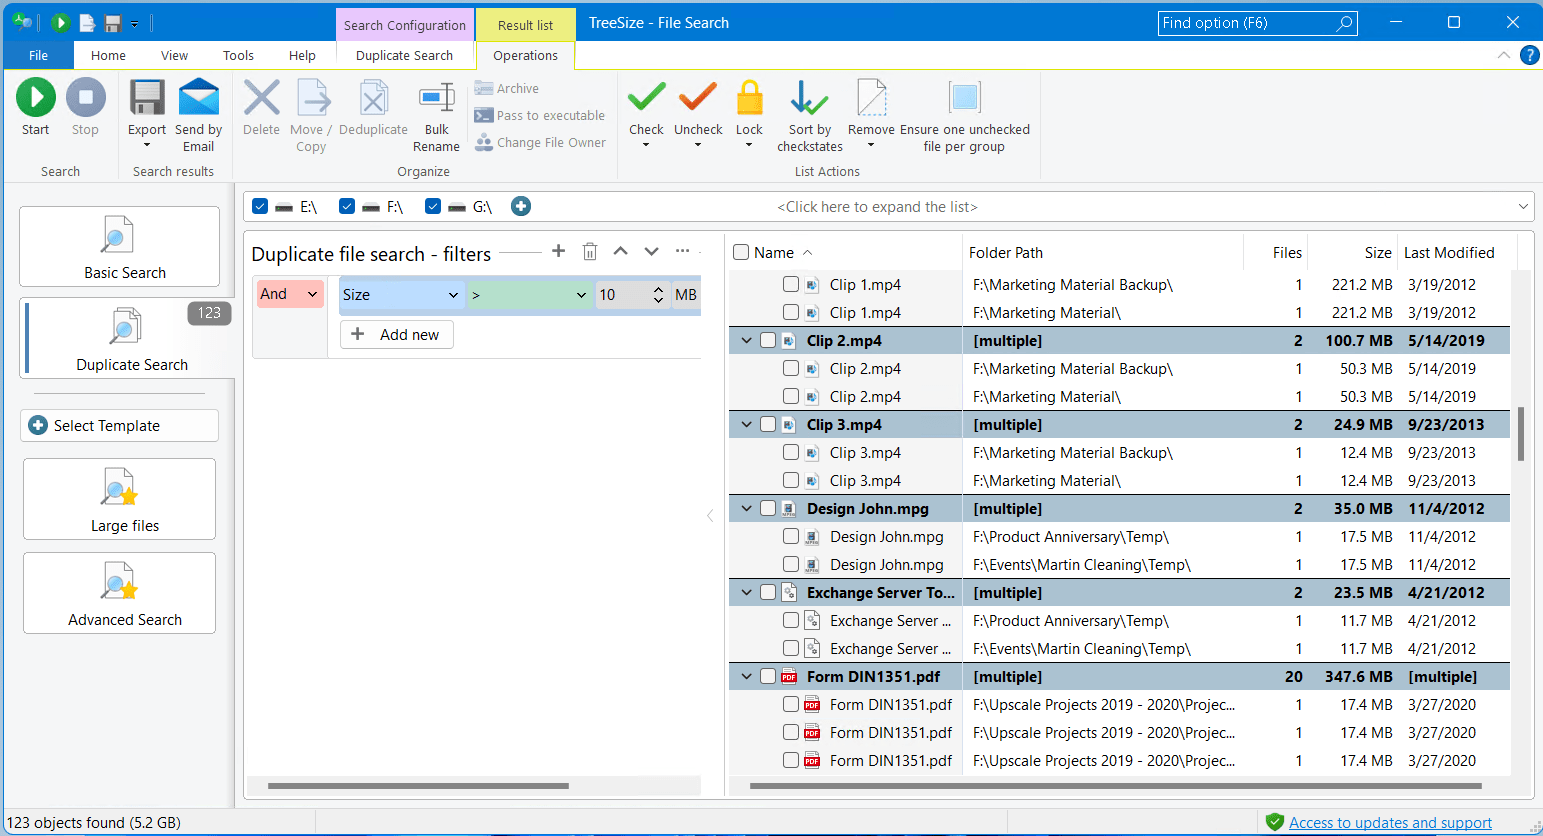
TreeSize finds duplicate files using various check methods. Starting with the same or similar names, the same size, TreeSize also finds files with exactly the same content (checksum method) or using other criteria.
The duplicates found are displayed in groups to make the list clearer.
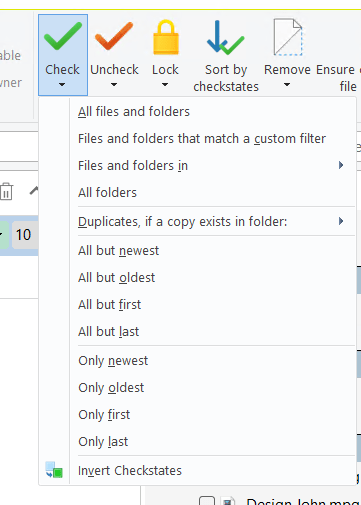
You can select files in each group and delete, archive or move them in one go so that only the desired files remain. In the "Operations" ribbon, you will find many options for marking specific files in the respective group.
If the list is too long, you can restrict the search to a minimum size or certain file types such as Office files. Simply set a corresponding filter on the left.
Identify forbidden characters and file names
SharePoint prohibits the use of certain file names and special characters. You should therefore ensure in advance that your data will not cause any problems during migration.
First of all, we recommend that you replace characters and names that are not valid on SharePoint with valid ones before migration, such as the underscore _. The following characters must not be included in names: " * : < > ? / \ |
Older versions of SharePoint on-premises (2016 or older) also prohibit % and #.
However, most of the time there is no need for action here: SharePoint Online and OneDrive prohibit the same characters that are already prohibited under Windows. Under the Windows NTFS file system, these cannot be assigned in the first place, but other file systems may allow them.
In addition to forbidden characters, some file names are also forbidden on SharePoint Online: CON, PRN, AUX, NUL, COM0 - COM9, LPT0 - LPT9. As these file names are already prohibited under Windows, there is generally no need for action here.
The situation is different with file names that only SharePoint does not allow: ".lock" and "desktop.ini". In addition, neither file nor directory names may contain the character string "_vti_".
Finally, it is important to check that there are no files or folders that have a space at the beginning or end, as this is also not permitted on SharePoint and OneDrive.
While Windows automatically truncates spaces at the end of the name, spaces at the beginning of the name are quite common.
Correct forbidden characters and file names
To find files that violate the naming conventions, open the TreeSize file search again and use the "advanced search".
In the advanced search, you can use filters to find files that meet very specific criteria - for example, files that violate naming conventions.
To cover all of the above rules at once, we have created a specific search template for the latest version of TreeSize. For older versions, you can rely on this: SharePoint template for invalid files.
When you open the template, you will find a search filter with the following rules:

Let's take a closer look at the search configuration. First, we see five different filters applied to the file name, all connected with an OR operator. This means that only one of the criteria needs to match to identify a file.
The first two filters check whether the file name matches "desktop.ini" or ".lock," as SharePoint files must not have these names. Meanwhile, the third filter checks if the string "_vti_" appears anywhere in the file name.
The last two filters verify whether file names match two specific regular expressions. Regular expressions are patterns used to search texts in a targeted way, for example, to find specific sequences like email addresses or postal codes.
In this example, the two regular expressions look for characters prohibited in SharePoint.
Decide for yourself how to proceed with the individual findings.
For example, you can quickly correct forbidden characters or spaces with the TreeSize mass renaming function under "Operations". Simply open it, define a rule for finding and replacing and execute it!
The mass renaming can also be undone in the event of an error.
You can find out more about the function in our TreeSize mass renaming guide.
Avoid migration of very large files
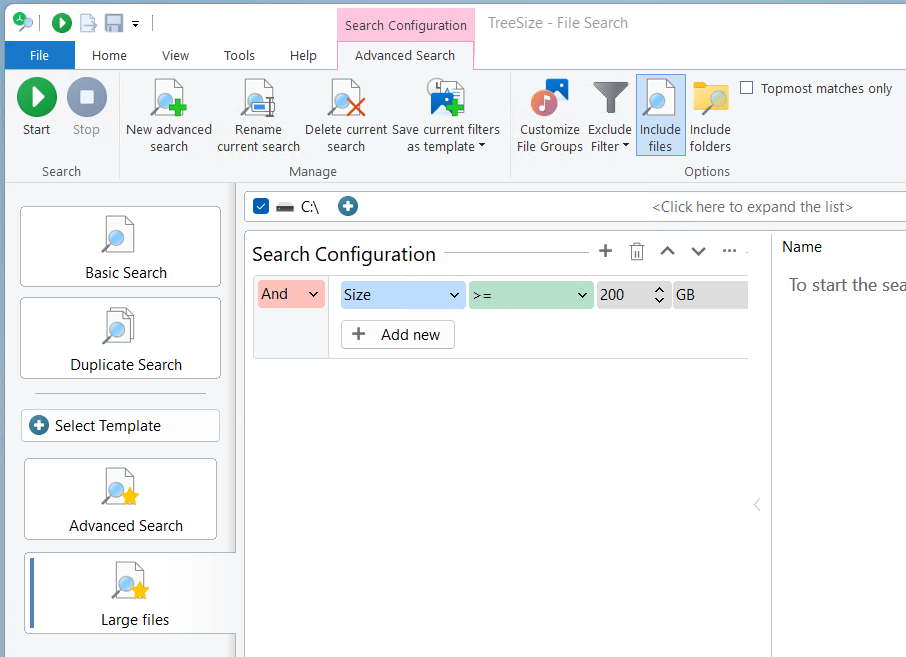
When migrating your data from SharePoint, you should not only pay attention to the naming of files, but also to their size. SharePoint defines a maximum size of 250 GB per file.
Our tip: It's better to set a lower limit. This is because large files often result in additional costs in the cloud and at the same time clog up the internet connection during synchronization.
In the TreeSize file search, you will find your own search template to quickly search for large files. Here you can also specify, for example, that only large files that were last edited a long time ago should be included.
Once you have identified particularly large files in your system, we recommend that you continue to save them locally. This will also make your access to them much faster.
Correct directory paths that are too long
Directory paths that are too long can also lead to a problem during SharePoint migration.
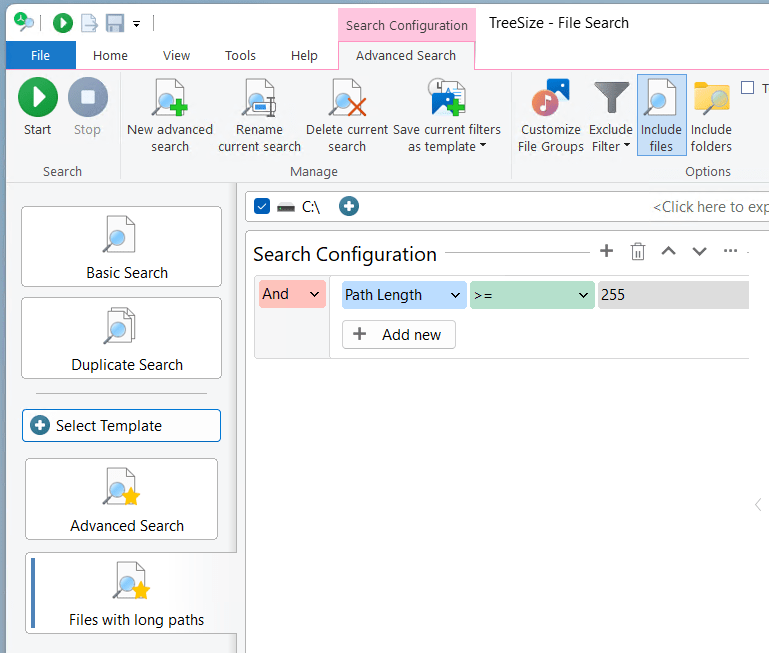
SharePoint and OneDrive allow a maximum path length of 400 characters. Path and file names are added together.
However, as problems with various applications can already occur with 255 characters or more, we again recommend using a value slightly below the maximum.
Again, the TreeSize file search can help with a search template provided. Select the template "Files with long paths" and start the search.
On the right-hand side of the results list, you can immediately start correcting the affected files again. We recommend shortening the names of the parent folders or moving the affected files and folders to a higher position in the directory hierarchy.
Perform SharePoint migration with TreeSize
Have you followed every step in this guide? Then you are now well prepared for the actual SharePoint migration!
TreeSize can also help you here. Because TreeSize can transfer files and entire directory branches and adopt directory structures and timestamps.
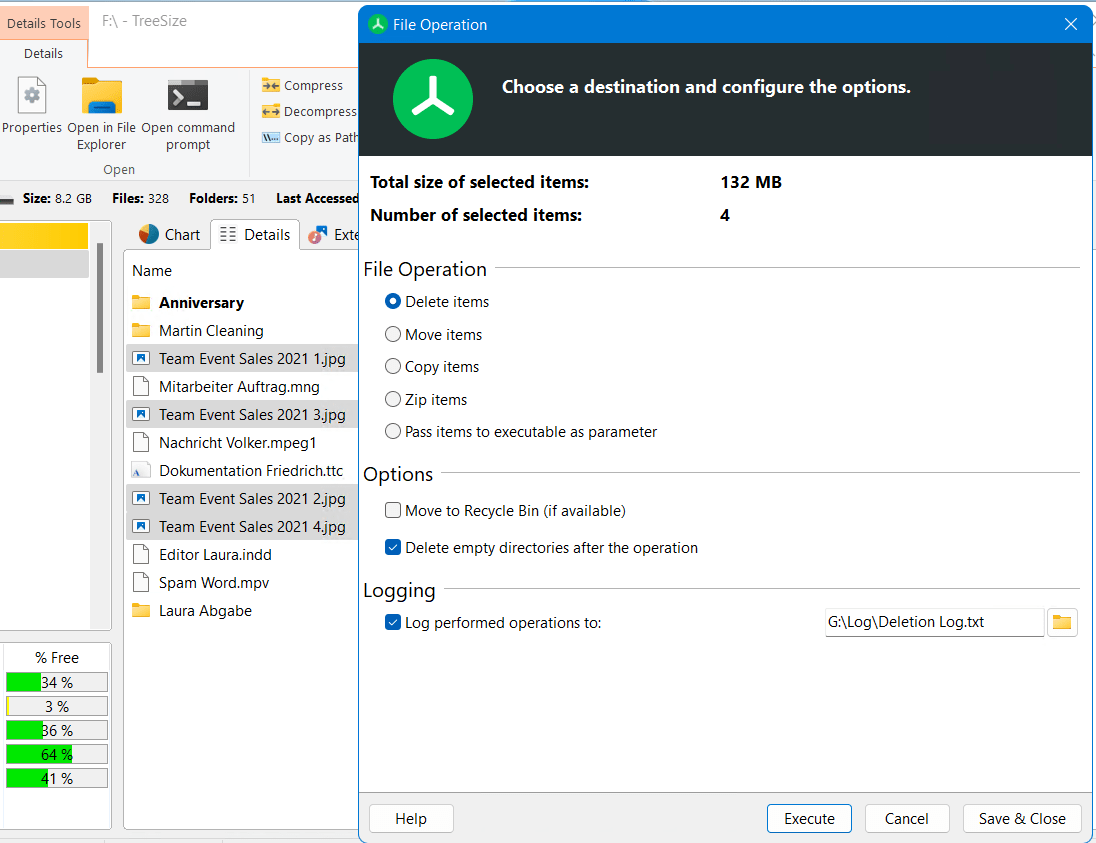
To do this, select a subset or the entire amount of data that you want to migrate and open the file operations.
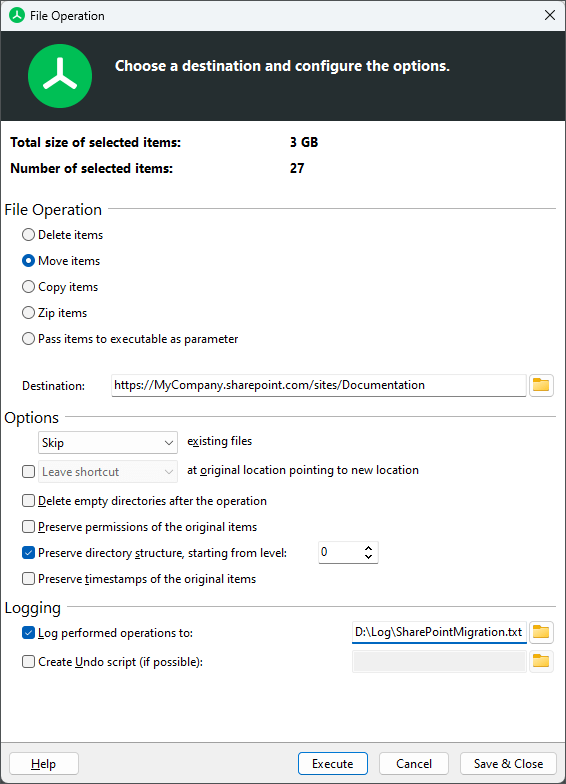
First define the target directory on your SharePoint server.
You can move all selected files or copy them first. TreeSize breaks down the amount of data involved for you at the top.
Did you know? TreeSize can also document all operations in a log file to make changes transparent for you. This allows you to check and undo any errors.
Migrate very large amounts of data to SharePoint
Are you planning to migrate particularly large amounts of data to SharePoint? Then we recommend migrating with SpaceObServer!
SpaceObServer is not only the big brother of TreeSize with the same look and feel, but also provides an index for all your storage metadata in a local database.
Your advantage: You can use storage scans that run continuously in the background instead of having to scan the entire system with TreeSize every time. This saves time and reduces network utilization, especially in very large environments.
With the Web Access Add-On, you can also provide other departments with convenient access to the Storage Scan via a web browser.
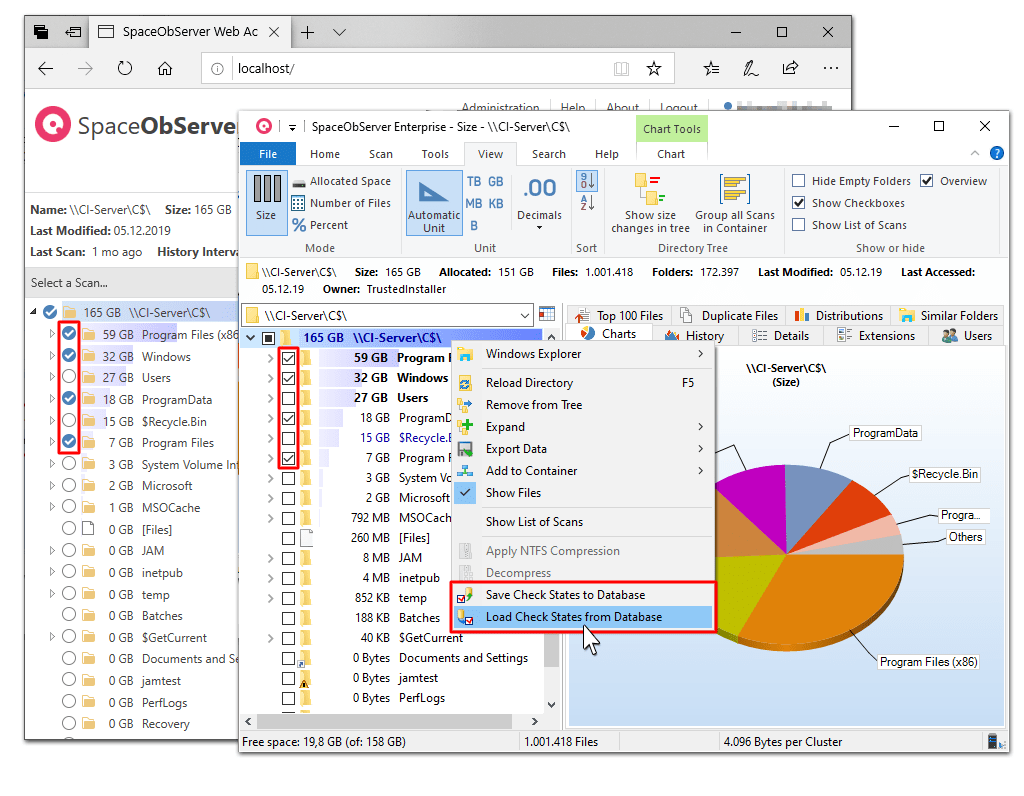
This makes it easier for data owners to select relevant data for migration, for example.
We advise you individually
In this guide, we have given you step-by-step instructions for migrating your data to SharePoint. Now it's your turn!
Download TreeSize for free and use the trial period to familiarize yourself with the tool and plan your migration.
Do you need more help? No problem!
We are also happy to help you with SharePoint migration with our consulting services. Register now for a free initial consultation!